Step 5: Decide if you want to frame out your tub, or not
You can stop here if you want. All you need to do now is raise your tub four inches above the level of your stove (to allow for the correct height for the stove’s thermosiphon to work properly), hook it up—find those steps below—and you’ll have your own hot tub, homemade DIY-style!
However, we highly recommend framing in the tub and adding siding so you have a seating area, wood storage, and a super-legit professional look.
Step 6: Place your tub and stove, mark out your frame
Place your stove and tub roughly where you want them to go on the deck and calculate for the width of the framing on either side of the tub, accounting for the length of the inlet/outlet ports from the tub to the stove.
If you want your siding to be flush with the edge of your deck you’ll need to account for that too. For example, our siding was ¾”, so I cut 1 ½” off the 8’ framing boards so each end would be flush to the deck once the siding was added.
The Chofu stove generates very little heat on its exterior. Almost all of the heat from the fire goes either into the tub water or out the chimney. Because of this, you need very little room on either side of the stove for fire-safety reasons. We have about two inches of air space on either side of ours alongside the frame, but we did leave most of the stove open to the air to allow for chimney space.
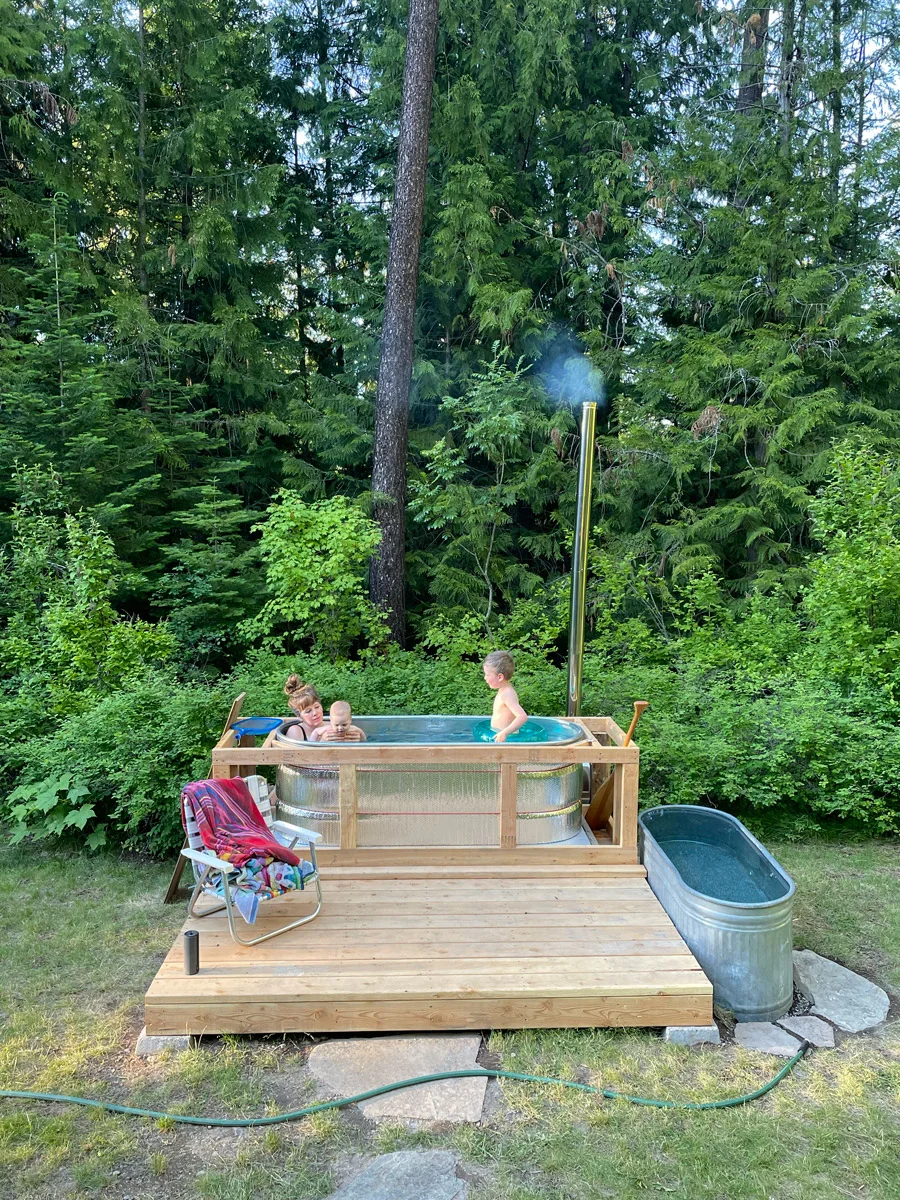
Enjoying the hot tub, mid-build
Step 7: Frame in the tub and lay down rigid insulation
With the basic location determined it’s time to frame in the tub. With metal stock tanks, Chofu recommends raising the base of the tub four inches above the base of the stove. The stove pulls cold water through the bottom port, which is then heated by the fire, and because hot water rises, it's pushed out through the top port and into your tub. To achieve this, you need a 3-4” rise for every foot of pipe. To give myself more flexibility in where I set the hot water port, I settled on a 6” rise, so I used 2x6 boards set on edge to frame around the base of the tub.
I then dropped in a layer of 2x6 scrap wood, spaced 6-8” apart, and layered two pieces of 2” rigid foam insulation on top of those. This brought the base of the tub roughly level with the top of the 2x6 frame and created a nice container for the foam, which is critical for retaining heat in the tub overnight.
I then framed around the tub with 2x4 lumber, leaving the top edge of the frame ¾” short of the lip of the tub, so the top layer of siding would end up flush to the tub. For the seating area at the back of the tub I used 2x4 joist hangers tied into an 8’ length of 2x4 to make sure it had enough structural strength to tolerate the weight of an adult or two.
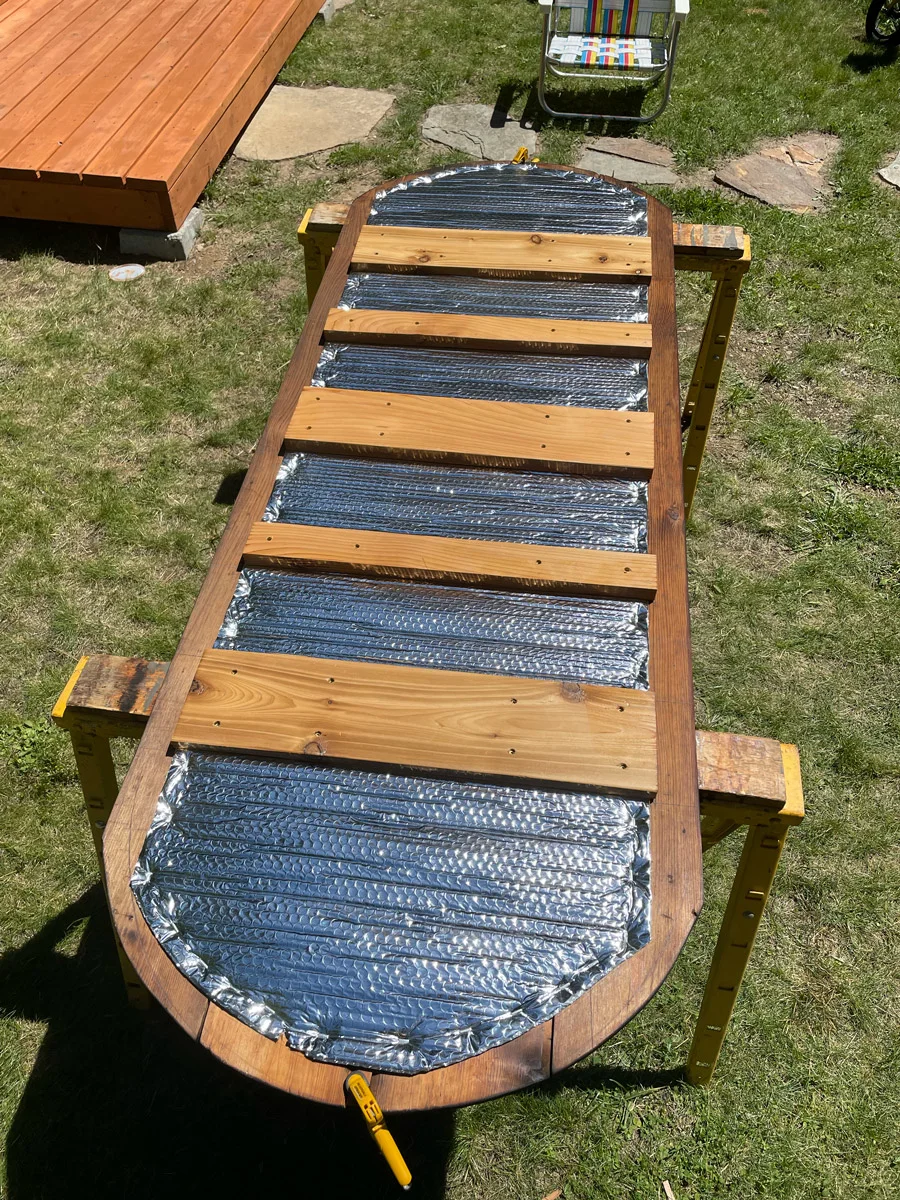
Building the insulated lid
Step 8: Make a lid for your wood fired cedar hot tub
We used salvaged cedar siding for our hot tub lid and exterior of the build. The easiest way to do this is to pull the tub out of the frame, assemble the appropriate amount of siding to cover the top, and flip the tub upside down on top of it. Then you can use the tub edge as a template to trace a line you can follow with the jigsaw.
However, I wanted the lid to overlap the siding by about 1” on all sides. The tub is 24” wide, so I added 2” to that measurement (26”), then divided that in half (13”). Then I tied a string to a pencil, and marked out a 13” length. I positioned the pencil 1” past the length of the tub, centered the 13” piece of string on the 24” width, and used the string and pencil held taught as a rudimentary compass to trace a 26” circle onto the wood. Then I repeated the process on the other end.
I now had a lid tracing 1” wider than the tub on all sides. I trimmed the straight edges of the lid to size with a table saw and used the jigsaw to carefully cut the circular curve.
Next, I cut a length of insulated bubble wrap and laid it out on the wood, then attached five horizontal pieces of 1” cedar scrap wood to hold the lid together and keep the insulation in place. I further secured the insulation with a construction stapler anywhere the supports weren’t pinning it down. Then I added two handles, making sure the screws went through the siding and into the horizontal supports so it’d be super solid.
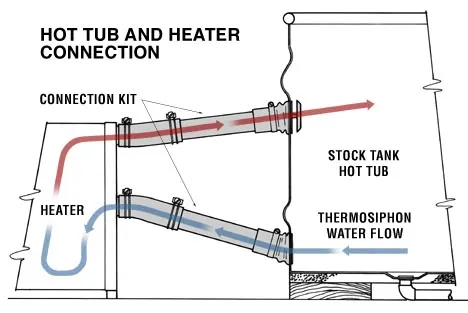
How the stove works | Image courtesy Islandhottub.com
Step 9: Measure and cut holes in your stock tank
This is the scariest part of the build! But it’s essential for having a heated hot tub. One minute you have a perfectly good stock tank, and the next you’ve got a $300 piece of metal with giant holes in it. Read your Chofu instructions closely here. Measure twice, cut once, and you’ll be ok.
With your stock tank and stove in place, carefully measure the location of your inlet and outlet ports as well as the drain location. Mark these holes and use the appropriate sized hole saw or jigsaw to cut the holes. I found the hole saws to be really difficult to use, so I used the plastic port hardware to trace each hole onto the tub using a black Sharpie. Then I drilled a smaller hole with a carbide drill bit to allow enough room for the metal blade of a jigsaw to fit through. Then I slowly cut the hole with the jigsaw, and filed the rough edges smooth with a round file.
Drop the tub back in and mark the drain hole on the rigid insulation, then pull the tub and cut away the necessary foam to accommodate the brass pipe, and cut a notch in the wood frame for the spigot to come out.
At this point you can wrap the tub in reflective bubble wrap insulation, trim it to size, and cut holes for the ports. I used a bit of packing tape to secure the bubble wrap, and then used two lengths of parachute rope to secure it further. Stock tanks typically have indented ribs in the sides, and I lined up the parachute rope with these, so when pulled tight the ropes sink into the grooves and lock the insulation in place.
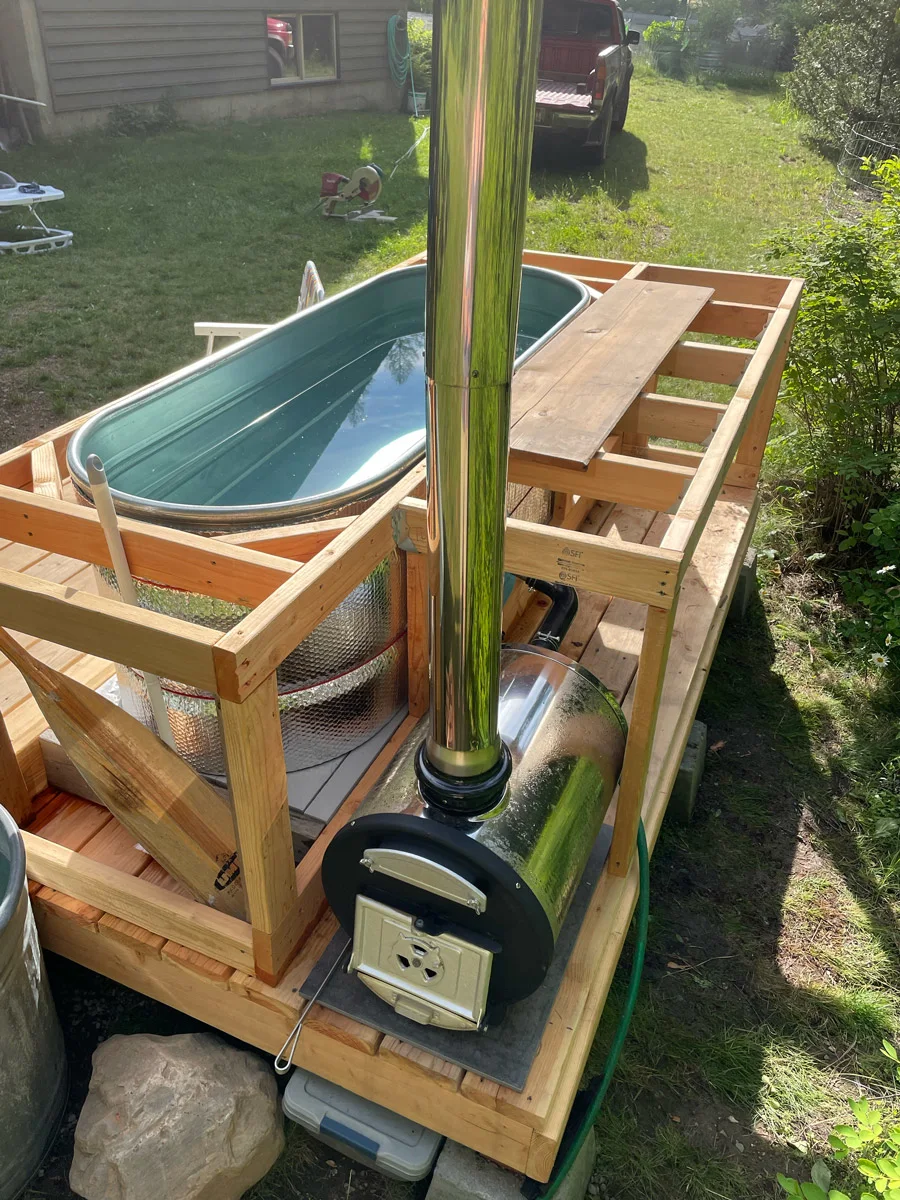
Chofu stove attached at the tub's back corner
Step 10: Hook up the stove and chimney
This is pretty straightforward now that you’ve got all the holes cut. The Chofu kit comes with a drill bit and self-tapping screws, which you’ll need to assemble the stove pipe. Hook up all the hardware, fill the tub to your predetermined fill level, and you fire that bad boy up. You now have a functional hot tub! If you’re impatient like us, you can use it while you finish up the build. The stove is also a great place to burn lumber scraps from the build.
Step 11: How to make Shou Sugi Ban siding
We treated each piece of siding in the Japanese Shou Sugi Ban method. Traditionally cedar is used, but pine and fir are also common. Charring the wood creates a naturally weather-resistant carbon layer, made further weather-resistant by treating it with tung oil, boiled linseed oil, or Danish oil. We went with Thompson’s Timber Oil as it was fairly cost effective for one gallon and easier to get at our small town ACE Hardware store. You do not have to treat charred cedar boards with oil, as cedar is naturally rot-resistant. However, the oil treatment really amps up the weather protection and has the added bonus of sealing in the char so you don’t get black marks rubbing off on your skin or clothes.
We borrowed a big propane burner attachment from a neighbor and carefully charred each piece of wood on the main face. We used a smaller propane burner to char the edges and any knots in the wood (which are much denser, and char more slowly than the rest of the wood). We left the backs of the boards un-charred, but treated them all with timber oil. Some of the long boards warped a bit due to the high heat of the charring process, and I found that wetting the back side of the board before charring really helped with this. Shorter boards seemed to be less prone to this effect than longer boards.
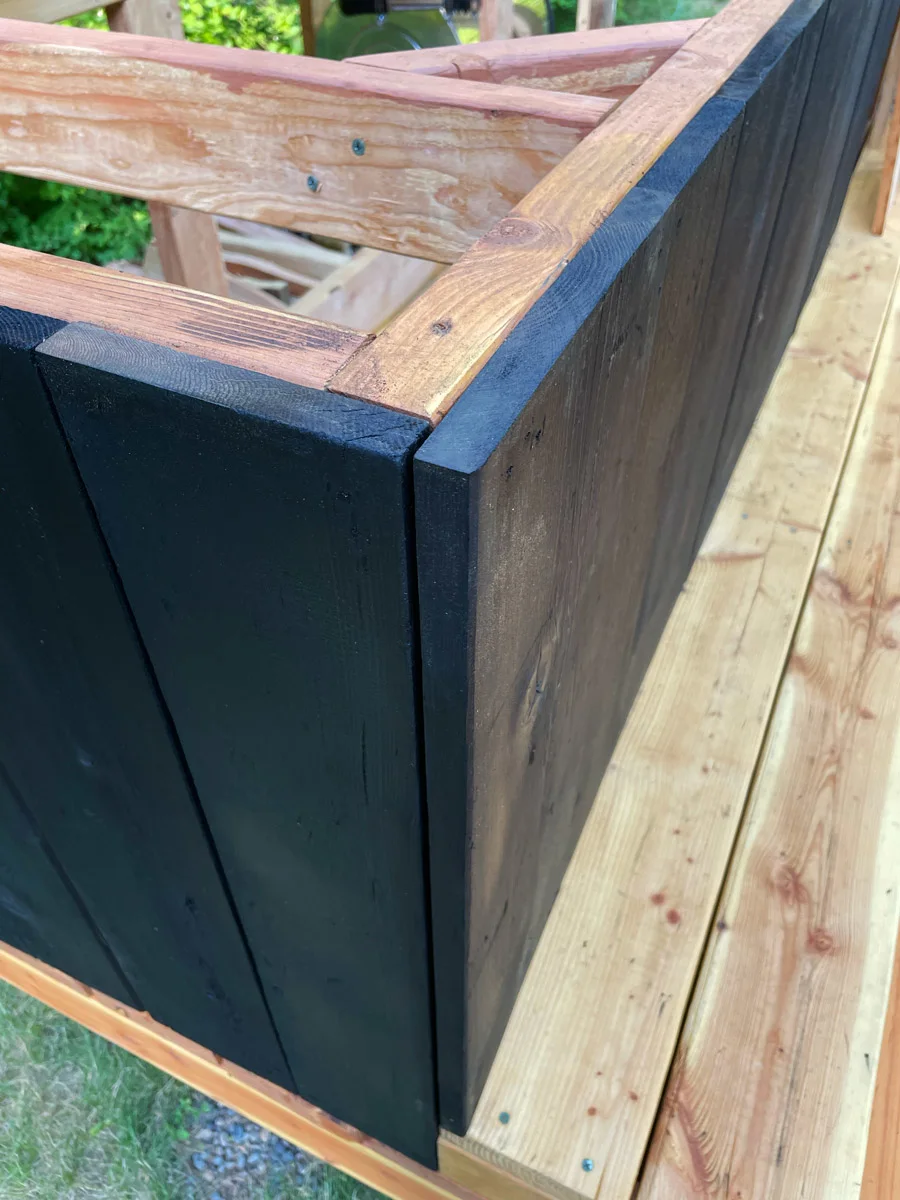
Sho Sugi Ban siding
Once the wood was cool to the touch, we treated it with the timber oil and let it sit for several hours before attaching it to the tub frame with a brad nailer. Once attached, give the wood 24-48 hours before using the tub so the oil will have time to fully cure.
You can save yourself a lot of time and effort by simply staining the siding, but I’ve wanted to try the Shou Sugi Ban method for years, and wanted something that could stand the test of time. Plus it looks fucking cool, if you ask me.
One quick tip: No matter how good a job you’ve done leveling, squaring, and measuring your frame, framing lumber is inherently imprecise due to minor warps and twists. As such, you’re always going to find an edge or a corner that is off by ¼” somewhere. Because of this I recommend measuring EACH siding board to fit so you can account for variances in the lumber and framing versus pre-cutting everything to a standard length and hoping it will fit perfectly—it won’t.